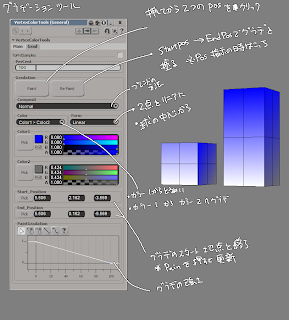
2015年12月25日金曜日

宣伝 : 【C89】東方リアルタイム戦略シミュレーション「幻想戦略譚」


キャラモデリングでお手伝いしていた同人RTS
無事完成しました。


発売は冬コミになります


日本のゲムはRTS少なめですので、
お手にとっていただけると幸いです


とりあえず、手持ちの仕事は一段落つきました
現在は、VR関係の勉強に入ったところです。
引き続きよろしくお願いします :p

2015年12月11日金曜日

memo : アンリアルフェス2015横浜で公開したNPR、トゥーンのアルゴリズムと使い方詳しく解説するよ(*´∀`)う

アンリアルフェス2015横浜で公開したNPR、トゥーンのアルゴリズムと使い方詳しく解説するよ(*´∀`)う


トゥーンシェーダーのメモ


近況報告


■仕事
・ほぼ終わり〜
一点冬に出ると思いますので、続報をお待ち下さい。

というわけで、3Dのお仕事は無職中

微妙にお仕事募集中ですw

フリーランスは次の仕事までの間に
勉強をしないとダメなので、休んでる暇などない


■習得

・屋根プラグイン
Houdiniでやるか、MAYAでやるか悩み中。
HoudiniでVC++環境が作れればいいのだけど、ちょっと難易度が高いっぽい
あと、プログラムは途中で仕事が入っちゃうと、
頭が切り替わら無いのがまずいところ

将来の為にはなりそうなんだけどねぇ


・Houdini
Indieライセンスが切れっぱなし orz
今のところ習得がメインならば、ライセンス必要無いことがわかったので、
切れっぱなしに
お金が無いだけともいう

チュートリアルで投資はしてます
帰って来ればいいけどね orz


・VR
iPhoneが壊れたので Galaxy s6 edgeを購入。もちろんVR狙い


Unityの数学本 > Unity > UE教本 > UE Shader 本って感じか。
多くを望みすぎな気がするよw


そろそろブログを変わりたい

2015年11月17日火曜日

memo : MAKING REALISTIC MATERIALS FOR 3D SCENES

MAKING REALISTIC MATERIALS FOR 3D SCENES

Substance DesignerとUE4のフォトリアル

メモです


最近、私生活でゴタゴタが多くて大変です :s


もうちょっと制作に集中したいですね :p

2015年10月27日火曜日

Game : Rebel Galaxy

Rebel Galaxy が面白かった


作りたいと思っていた宇宙船ものでした。
アサクリの船とほぼ同じです


舞台が宇宙の割には起動を平面に制限してますが
それが魅力となってます。
特に宇宙での戦闘は上下がないため
艦隊が上下反転して対敵することも有りますがw
絵面がカッコ悪いですからね。


ひっくり返ったヤマトと戦いたくはないw


■メモ
・宇宙ものであるが、艦船の上下の移動はない(戦闘機は上下
思い切った制限ですが、これは有りだなぁ
・主砲は側面のみ
・装甲、シールドは四方 + バリア(全体 時間制限あり(アサクリの対弾防御ですね
・ターレットは 場所によって角度の制限あり
・ターレットは 目標を指定できる

■エフェクトメモ
・星雲はどうやってるか謎
・シムによる連番画像 + 板ポリ
・デブリ、おそらく板ポリに、オブジェクトの回転の連番動画
・歪みを画面全体に適用(ワープ時

ま、アサクリの船だけ宇宙にしたゲームですがw(また言った
非常に出来がよかったです

モデルは ぎり合格ラインですが、
戦闘機はかっこいい気がする。

終盤になってくると、
ドカドカ撃ってるだけで敵が落ちるので
病みつきになります

良いゲムでした


■雑談
UE4とオキュで、自分でゲムを作りたい。
と思ったのですが、

前回で自分の作りたいゲムに手をかけてしまったので、
改めて、自分がやりたい、作りたいゲムを見直し中です。

ということで、ヨーゲーやりまくりです。
まだ、答えは出てないですが、
なんとなくおぼろげながら見えてきたので
よしとします :p

が、明らかに数学力が足りてない orz

背景の仕事は継続中デス :p

2015年10月2日金曜日

MODのススメ

最近洋もの シム、ストラテラジーばかりやってるTERAです。


■最近お気に入りのゲム
大当たりなのは Cities : Skylinesです。
Sim City系なのですが、
道路の自由度が高く、
参考になることばかりです。

ええ、研究のためですよ。たぶんw

で、一応ゲムを開発してる人間としては、
それが、どのような構成でできているかは
非常に気になるところ。

そして、欧米のゲムの懐が深いのは、
それを紐解くことのできる
MOD文化があるところです。

MOD、いわゆる、
ゲームの改造ですが、
パラメータをかまうだけでなく、
Objectの追加など、
新しい要素を加えることができます。

それを推奨しているゲームもあります。

C:Sもその一つで、
建築物などを自由に追加できることができます

それをユーザーが簡単に共有できるので
ゲーム自体を拡張することができます。

いいですよね、
ユーザーがオブジェクトを
無料で作ってくれて、

勝手に育つ

究極ですw


■ゲーム内のオブジェクトを作る

ゲームの中に組み込むというのは、
思った以上に制約が多く、
仕様に沿ったものでないと不具合を起こします

また、見た目にもわかりやすく
クオリティの指標になります
なんたって組み込んだ後ですかね

具体的にはテクスチャの解像度、枚数、仕様、
ポリゴン数の制限、LODの制作など、
たくさんの項目があるかと思いますが

非常に勉強になります


最近はエンジンがはやってて、
そればかり目が行きそうですが、

MODが提示する、
仕様に沿って作ってみるのが一番、
現場に近いですw

納期と報酬があれば現場w


■しかし、高度すぎてMODできないゲムもあるw

上のC:Sは、比較的モデリング、
テクスチャは単純でMODを作るのにさほど難しい
ってことはないとおもいますが、

同じくシム系である、どちらかと本流である
SimCity2013を見てみました


From AAA to Indie: Graphics R & D
PDFあり


Building and Rendering SimCity (2013)
Custom Building Models Development (Help Wanted!)

・・・、さすがAAAタイトル、MODる気になれない。
まず、素材にチャンネルわけって所が
殺しに来てますね w

あと、内装の視差マップとか、
半透明使わなくても表現できるとか。
勉強すること盛りだくさんじゃないですか orz

という感じで、MODると
、 勝手に開発に参加できて、

しかも、スキルが上がるんじゃね?
ってはなしでした。

精進します


SimCity2013きれだけど、ゲムとしては
Cities 面白いですよ :p


■内装の視差マップ
正しくはこれ
GPU Games 3
Relaxed Cone Stepping for Relief Mapping(PDF)

2015年9月16日水曜日

Python 内包表記

ども、更新をさぼってるTERAです

というより、Houdiniの有償チュートリアルをやってる場合は、
書けることがありませんw(とごかましてみます

まあ、本題の Pythonの内部表記ですが、
ちょっとこんなコードがあって、解読に困りました

#Houdini : Python
neighbourDict = dict((point, [geo.iterPoints()[int(num)] for num in point.attribValue(neighbourAttrib).split()]) for point in points)

勝手に改行されてると思いますが、一行です
なんでも一行に書けばいいってもんじゃないと思います orz

要約すると (ポイント, [近似のポイント,近似のポイント,,,])
を辞書登録してるだけです

これはPython 2.6時代の辞書表記で、
内包表記ではないようです。


2.7からは内包表記もできるよってことですので、メモです

詳しくはこちらに
各種リテラルと内包表記について


他力本願ですが2回ぐらい調べたのでメモしておきます orz


■近況

・Houdini
屋根の自動生成
こちらをぼちぼちと追ってはいるのですが、
なかなか成果につながりません。
まあ、ちょっとずつです。

とりあえず、傾斜に合わせてUVを自動で張り付けることはできました。


・仕事
背景と、アセットづくり中。
こちらはまだSIです

2015年8月19日水曜日

memo : AI : ゲームAI -基礎編- 『知識表現と影響マップ』

Cygames Engineers' Blog さんから

非常に面白かったのでメモ

・探索経路
ダイクストラ法 最近やったけど忘れたのでもう一度調べる

・正視化
判断しやすい。
積和合成で係数を1にすると、コレも正視化されたものになる < NEW!


とかなんとか。うーむAIも面白いのう :p

というか、こんな風に視覚化してもらえると分かりやすいよね〜


近況

・PS4買ったった
・クーラーが買い直せていない


Game
・ドラクエ ヒーローズ
  息子がやってるのを横目。パーティクルが派手

・ドラゴンエイジ インジェクション
 微ハマり。非道ルートばく進中


暑くて習得意欲がわきません :p


背景の仕事の入りが伸びたので、微暇 :p
積みゲー消化中

2015年8月11日火曜日

宣伝とか、仕事とか、近況とか

公開されましたので、宣伝を兼ねて紹介を :p

IS<インフィニット・ストラトス> ヴァーサス カラーズ アペンド


サイト>リンク


・モデリング・リダクション(IS部) : 盾無、簪
・エフェクト : 全般

前作からの続投です。
簪のミサイルベイは地味に物量が多くて大変でしたよ〜


UNDER NIGHT IN-BIRTH Exe:Late[st]


サイト > リンク

・背景制作 : モデリング、テクスチャ

こちらも前作からの続きですが、背景のお手伝いです :p


近況


■Game
という訳で、マスターアップも終わり
ちょっとした休息がてらゲムを :p

・The Witcher 3
オープンワールドRPG
前作もクリアした。凄い物量、あり得ない。
ただただ、圧倒 まだクリアしてない

今回はエルフとエロい事は出来ないんですか!?

・Cities Skylines
シム系、道路エディッタだけでも欲しい orz
Houdiniでも勉強中なのだが
超えれない壁が高すぎる

・Sim City
上とくらべたくて。
土地が狭いよ


■故障
クーラー壊れてる。
死ねる orz


■旅行
京都へ旅行。

息子の願いで銀閣寺に2度も行った。
理由はマインクラフトで作るからだそうだw

銀閣寺、空間構成がすばらしすぎる。
古典だけど、レベルデザインだね。これは。


そんな感じ

2015年7月29日水曜日

Unity : Shader : Memo : いつか見たShader のVer5対応

playing with Unity 5's deferred shading pipeline


UnityのShader ScreenSpaceで、イロイロやっておられる方のあれです。スバラシ


なかなか理解出来てないですがメモしておきます

雑記

Shaderを含め、いろいろ勉強しないとだめですな :p

2015年7月21日火曜日

Houdini Tutorial

Houdini Tutorial 01 | Plexus from Danil Krivoruchko on Vimeo.

Scene source:
https://dl.dropboxusercontent.com/u/26815/_tutorials/01/houdini_01_plexus.hip

Hey everyone!
After about year and a half after I switched to Houdini from Autodesk Softimage I decided to create series of tutorials with a things I`ve learned so far.

This one is about making Plexus-like effect in Houdini. I hope you`ll find it useful.
And sorry for my English, I`ll try to improve it over time =)

The scene includes more optimized substitute of FOREACH node so now it runs 75 times faster.

SCENE UPDATE:
- new replacement of Plex+Clean pair of nodes is about 2 times faster for big point clouds.
- one more option for splitting polygons added - this one is almost 10 times faster than vex code.

メモ

このかたのチュートリアルは 有償チュートリアルにひけを取らないなぁ


絶賛修羅場中

2015年7月6日月曜日

Substance Designer 5 Tips : Pixel Processor で画像を歪ませる

PixelProcesser001.md—/Users/kawabata_imac/Dropbox/Blog/Allegorithmic

いまだ、3Dの回転が良くわかってない TERAです

前置き 飛ばしてよい

エフェクト用のテクスチャを制作するとき、
思い通りに歪ませる事って難しいですね。

機械的にやろうとするとなおさらです。

ひさびさに Substance Designer 5 を
立ち上げてみました。

Verが 5になって、3回目の立ち上げです。

VectorMapが搭載され、
思うように歪ませる事が出来ると思ったのですが、
思うように制御出来ません

VectorMapって RGで処理するん 違うの?
Rを入れると XY 移動するんだけど orz
Normal使うの? って訳が分かりませんでした。

調べるのもおっくうになって来たので、
同じく Ver 5 で搭載された PixelProcessor を使って
制御出来る物を組んでみました

環境

Substance Designer5

目的

グレースケール画像を利用し
画像を指定方向 x,y に向けて歪ませる

ノード

組み方


最初のノードの組み方はこんな感じです

上部に歪ませるカラーマップ、
下に歪みの元となるグレースケールの HeightMapを用意します

Pixel Processer

ピクセルプロセッサー内の処理です。 あらかじめ二つの変数を用意しておきます。

・ X,Yどちらに移動するかのスイッチ
・ 移動量の調整する値

流れ

  • グレースケール座標の 値を取得

  • その値に、調整量を掛ける

  • 調整量を掛けた物で、カラー画像を再サンプル

以上です :p

イロイロ凝った事が出来そうですね〜。楽しからずや

2015年7月2日木曜日

Houdini Tips : Wrangle 等幅拡張

Houdini Wrangle ケイ拡張.md—/Users/kawabata_imac/Dropbox/Blog/Houdini

ども、大腸がん検診にひっかかって、
尻を掘られたTERAです。

まあ、尻を掘られただけで、
特に問題はなかったのですが、健康大事w

というわけで、
Houdiniネタです。

3D系のツールは何でも
ノードになって来た今日この頃、
便利とは思うのですが、
コードの方が便利なことが多々あります。

というわけで、Houdiniでは、
wrangleノードというのが用意されてます。

なんというか、vop sopが
書いてくれるコードを自分で書けみたいな。

実行速度も、かなり早いようです。

で、調べてみたのですが、
新たな VEX Expressionを覚えないとダメっぽい

チュートリアルを確認すると
c/c++やRenderman Shading Language
と似てるっては書いてありますね。

これは、メンドクサイと思っていたのですが、
どうやらこれ、VertexShaderとほぼ、同じ考え。
入って来たポイント事の処理なようです

Attributeもがんがん加えられるので楽チンチンです
というわけで、平面を太らせる ノードを作ってみました

Point Wrangle

vector vec,vecY = set(0,1,0),v1,v2;

i@fID = (@ptnum - 1) % @Npt;
i@bID = (@ptnum + 1) % @Npt;
v1 = normalize(point(@OpInput1,"P",i@fID) - @P);
v2 = normalize(point(@OpInput1,"P",i@bID) - @P); 

vec = v1 + v2;

if(length(vec) <= 0.001)
{
    vec = cross(v1,vecY);
    @N = vec;
}
else
{
    if(dot(cross(v1,v2),vecY) > 0)
        vec *= -1;

    v1 = normalize(cross(v1,vecY));
    normalize(vec);
    @N = vec / abs(dot(v1,vec)); 
}

@P += @N * ch("width");

Parameter

Point Wrangle ノードに "width" の
floatパラメータを追加してます

思った事

  • 条件がめんどくさかったので
    (@ptnum - 1) % @Npt
    を使ったけど下策だとおもわれ

  • 直線に並んだ時の処理が無かったため、
    慌てて付け加え

  • 頂点IDに依存してるので、あまり使い勝手は良くないですが、
    まあ、手始めの第一歩ということで。

近況

VR勉強会に行って来た オキュ欲しい :p

2015年5月29日金曜日

Houdini Tips : 極座標

Houdiniで極座標系をやってみました


極座標については以前Softimageでやってたので、それの Houdini Verとなります
ICETips : ICEで極座標

Softimage ICEとの違いは
・Houdini の Pos は最初から Global 空間で取れる
・Sine Cosine は ラジアン

なこと でしょうか?


ただ、Houdiniでは、PIの定数がわからなかったので、
要宿題ですな :p

2015年5月28日木曜日

Houdini : 近傍の頂点カラーの参考

頂点カラーでグラデーションがめんどくさいので
どうにかしてみた。

グラデーション用のGridの制作

GridにUVを適用し
Uの0-1を取得する

この0-1を利用して
頂点カラーにグラデーションを適用する
アルファも加える


Gridから、頂点カラーの取得


Sphereを作成
PointCloudで、Gridの頂点カラーを取得

PointCloudなので、投影面は選べないが
Gridに対しての最短距離は
Gridの投影と同じ事なので問題ないか :p
出来りゃ良いよね


Houdini力をあげて行きたい物です :p

2015年5月27日水曜日

MEMO : HUD

カッコいいゲームや、映像はHUDがカッコいいです :p

HUDを作る時の参考用メモ


■有償素材

HUD Elements Mega Pack from BRODZELi on Vimeo.


■UIReel


近況

・Unityのエフェクト制作
・キャラクター制作
・背景制作 NEW!


お仕事いただけてる感じ :p


Houdini 習得コストが高めデス

2015年5月11日月曜日

雑記 : 近況

■お仕事
一段落ついた感じ。

終了
・リトポ&モデリング
・キャラクター

新規
・エフェクト(Unity)
・キャラクター(上記の追加)

となっております。
とりあえず途切れる事無く頂けてる感じ :p

■ゲーム
連休中にゲームやってました。
Houdini チュートリアルをやるべきではあったけど・・・。orz

・Dying Light(PC)
Teck Islandのゲーム、Dead Islandとか作った所。
一人称のアサクリ、スカイリム、FarCryシリーズの
良い所を取った感じで非常に楽しめた。
ゾンビの被ダメージモーション(物理演算)が気になる。
どうやってるんだろ。

・ファンタシースター (Vita)
外伝ぽい流れ?
メガドライブ以来のファンタシースターでした :p
日本人っぽい成長物語ゲー

わりと楽しめた気がスル。
ただ成長システムが複雑、
パラメータが乱立してた。
最近の和ゲーはこんな感じなんでしょうか?


■本
物理シム系の本を購入。
古本で購入した。もうちょっと簡単な物かと思ってたけど
Physicsを使ってあったり、
世代がちがって(XNAとか)失敗した感 orz

少々高くとも新しい本を買うべきか


■アプリ
PaintStorm Studio
2ライセンスほど購入

特徴としては筆のカスタマイズ性が豊富
遠近法で、筆のパラメーターを変更する事が出来る

3DのDepthレイヤーで遠近のパラメータを変更できたら便利だよね
と、つたない英語で要望を出した所
対応してくれると返事を頂いたので、とても楽しみ

応援してます :p

2015年4月4日土曜日

UE4 : レーザーとかシールドとか

https://www.unrealengine.com/blog/lasers-shields-planets-polishing-arsenal


メモ

UE4 : GDC2015 : Creating the Open World Kite Real-Time Demo in Unreal Engine 4

メモ

詳細なロケハンが必要ですなぁ。

先日ちょっと遠出をしたのだけど
カメラにメモリーカードが入ってなかった orz

やっちまった orz

2015年3月20日金曜日

UE4 : Shader : Hair

https://forums.unrealengine.com/showthread.php?63555-FREE-Hair-Material 髪の良いシェーダー メモ

2015年3月17日火曜日

カテナリー曲線


電線を自動化できないかと思って調査
思った以上に難易度高い orz

はいぽりっく関数って何よ・・・。

とりあえず、SketchUPのRubyをみて、
SIのPythonに移植まではできた。

だけどやってることはほとんどわからないです orz


参考サイト


Houdini Hip
http://www.sidefx.com/index.php?option=com_forum&Itemid=172&page=viewtopic&p=103132&sid=85aa23c1c1eb2cce0b5f59a635c71c45

Houdini
http://forums.odforce.net/topic/1322-challenge-helical-cable/

懸垂曲線 Math
http://www.epii.jp/articles/note/math/catenary

プログラム
ソースは無し?
http://demonstrations.wolfram.com/CatenaryTheHangingChain/

SketchUP Plugin Simple
Ruby Sorceつき
http://sketchucation.com/forums/viewtopic.php?t=22472

双曲線関数が必要になる(汗
http://21.xmbs.jp/shindou-287823-ch.php?guid=on

コードあり
http://sky.geocities.jp/lite_and_seen_lite/gaihen_hello_7.html

鉄塔
http://www.fair-sky.net/wada/souden/index.html

2015年3月16日月曜日

Softimage Script : 円状に集める2 等間隔

SIを使う人はもうないだろうから、
付け焼き刃的なスクリプトのままメモ

とりあえず、円周上に等間隔に整列するようにしてみました。


ズレる時はローカルで回転させてあわせてます。


Sorce

#AligenCircle
#
# 02 28 2015 ver 0.1
#
# 選択がまだ甘いがポイント選択状態だと動く
#
# ベクトルは選択したポイントの平均
# 中心はBBOX ,半径は一番遠いポイントまでの距離の設定になっている


app = Application; log = app.LogMessage
oCmdLog = app.Dictionary.GetObject( "preferences.scripting" )
userPref = oCmdLog.cmdlog.value
oCmdLog.cmdlog.value = False

import math
from win32com.client import constants as c
DEBUG = True
CUSTOM_RAD = False
CUSTOM_CENTER = False
CUSTOM_NORMAL = False
NORMAL = [1,0,0]


#Select
#Application.SelectGeometryComponents("grid.pnt[30-32,39-41,48-50]")

CENTER = (3,0,-1)
def vLog(v):
 return str(str(v.X) + ", " + str(v.Y) + ", " + str(v.Z) + "")
 
def dLog( str ):
 if DEBUG == True:
  log(str)


#サークルデータのソート

#---------------------------------------------------
# circleSort
#---------------------------------------------------
def circleSort(Center,pnts):
 o = XSIMath.CreateVector3(CENTER[0],CENTER[1],CENTER[2])
 v = XSIMath.CreateVector3()
 
 idRad = []
 
 for pnt in pnts:
  p = pnt.Position
  
  #中心点からのベクトル
  v.Sub(p,o)
  #vlog(v)
  r = math.atan2(-v.Z,v.X)
  
  if DEBUG:#Debg時にはわかりやすいように度表記で
   r = int( r / 3.141519 * 180)
  idRad.append( [r, pnt.Index] ) 
 idRad.sort()
 
 sortedIDs = []
 for i in idRad:
  sortedIDs.append(i[1])
  dLog(str(i))
  
 dLog("circleSortIDs : " + str(sortedIDs))
 return sortedIDs


#---------------------------------------------------
# getWorldPos
#---------------------------------------------------
def getWorldPos( pts, m4 ):
 posArray = []
 for pnt in pts:
  p = pnt.Position
  p.MulByMatrix4InPlace(m4)
  posArray.append([p.X,p.Y,p.Z])
 
 return posArray

#---------------------------------------------------
# getAveNormal
#---------------------------------------------------
def getAveNormal(pts,m4):
 n = XSIMath.CreateVector3()
 x = 0
 y = 0
 z = 0
 
 for pnt in pts:
  n = pnt.Normal
  
  #ノーマル座標(逆行列の転地をつかう)
  #m4.InvertInPlace()
  m4.TransposeInverseInPlace()
  n.MulByMatrix4InPlace(m4)
  x = x + n.X
  y = y + n.Y
  z = z + n.Z
  
 
 num = pts.Count
 n.Set( x / num, y / num, z / num)
 n.NormalizeInPlace()
 return n


#---------------------------------------------------
# getCenter
#---------------------------------------------------
def getCenter():
 center = XSIMath.CreateVector3()
 bbox = Application.GetBBox()
 rad = 0.01

 xLength = bbox(3) - bbox(0)
 yLength = bbox(4) - bbox(1)
 zLength = bbox(5) - bbox(2)
 xMid = xLength / 2 + bbox(0)
 yMid = yLength / 2 + bbox(1)
 zMid = zLength / 2 + bbox(2)
 center.Set(xMid,yMid,zMid)

 return center
 
#---------------------------------------------------
# getBBOXRadius
#---------------------------------------------------
def getBBOXRadius():
 bbox = Application.GetBBox()
 tmp = 0.01

 xLength = bbox(3) - bbox(0)
 yLength = bbox(4) - bbox(1)
 zLength = bbox(5) - bbox(2)
 
 if xLength > tmp:
  tmp = xLength
 if yLength > tmp:
  tmp = yLength
 if zLength > tmp:
  tmp = zLength
 rad = tmp * 0.5
 return rad


#---------------------------------------------------
# createCircleMatrix
#---------------------------------------------------
def createCircleMatrix(aID,aPos,normal,center):
 circleMatrix = XSIMath.CreateMatrix4()
 p = XSIMath.CreateVector3()
 v = XSIMath.CreateVector3()
 farPos = XSIMath.CreateVector3()
 offsetCount = 0
 maxLength = 0
 
 for i in range(len(aID)):
  p.Set(aPos[i][0],aPos[i][1],aPos[i][2])
  v.Sub(p,center)
  if maxLength < v.Length():
   maxLength = v.Length()
   farPos = p
   offsetCount = i

 x = XSIMath.CreateVector3()
 y = XSIMath.CreateVector3()   
 x.Sub(p,center)
 x.NormalizeInPlace()
 y.Cross(normal,x)
 y.NormalizeInPlace()
 
 circleMatrix.Set(
 x.X, x.Y, x.Z, 0,
 y.X, y.Y, y.Z, 0,
 normal.X, normal.Y, normal.Z, 0,
 center.X, center.Y, center.Z, 1)
 
 return circleMatrix,offsetCount


def circleSort2(aID,aPos):

 xID = 0
 yID = 1
 zID = 2
 
 idRad = []
 for i in range(len(aID)):
  r = math.atan2(aPos[i][yID],aPos[i][xID]) #y,x
  r += 0.01
  
  if DEBUG:#Debg時にはわかりやすいように度表記で
   r = int( r / 3.141519 * 180)
  idRad.append( [r, aID[i],i] ) 
 idRad.sort()
 
 sortedIDs = []
 
 for i in idRad:
  sortedIDs.append(i[2])
  dLog(str(i))
  
 dLog("circleSortIDs : " + str(sortedIDs))
 return sortedIDs


#---------------------------------------------------
# getWorldCirclePointsPositionArray
#---------------------------------------------------
def getWorldCirclePointsPositionArray(aID,aPos,center,radius,circleMatrix,offset):
 m4 = XSIMath.CreateMatrix4()
 im = XSIMath.CreateMatrix4()
 p = XSIMath.CreateVector3()
 m4.Invert(circleMatrix)
 im.Invert(m4)
 
 circlePositionArray = []
 
 #world to circle
 for i in aPos:
  p.Set(i[0],i[1],i[2])
  p.MulByMatrix4InPlace(m4)
  circlePositionArray.append([p.X,p.Y,p.Z])

 sortedID = circleSort2(aID,circlePositionArray)
 
 #AligenToLocalCircle
 dLog(offset)
 segment = len(aID)
 for i in range(len(sortedID)):
  j = (i + len(sortedID) / 2 ) % len(sortedID)
  x = radius * math.cos( j * 1.0 / segment * 2 * math.pi) 
  y = radius * math.sin( j * 1.0 / segment * 2 * math.pi)
  z = 0.0
  circlePositionArray[sortedID[i]] = [x,y,z]

 #Circle to World 
 newCirclePositionArray = []
 for i in circlePositionArray:
  p.Set(i[0],i[1],i[2])
  p.MulByMatrix4InPlace(im)
  newCirclePositionArray.append([p.X,p.Y,p.Z])
  
 return newCirclePositionArray 

#---------------------------------------------------
# main
#---------------------------------------------------
def main():

 #Defalt
 radius = 1.0
 center = XSIMath.CreateVector3(0,0,0)
 
 #if app.Selection().Count < 0:
 # return
 oSel = app.Selection(0)
 oSub = oSel.Subcomponent
 obj = oSub.Parent3DObject
 oColl = oSub.ComponentCollection
 
 #VertexCollectionから、IndexArrayを取得できないので一度ポイント選択にする
 if oSub.Type != "pntSubComponent":#point#
  Application.SelectFilter("Edge")
  Application.SelectAdjacent("", "Point", False)
  oSel = app.Selection(0)  
  oSub = oSel.Subcomponent
  obj = oSub.Parent3DObject
  pts = oSub.ComponentCollection
  
 else :
  pts = oColl

 if pts.Count < 3:
  log("selection error")
  return
  
 aID = pts.IndexArray
 pointNum = pts.Count
 
 normal = XSIMath.CreateVector3(NORMAL[0],NORMAL[1],NORMAL[2]) 
 circleMatrix = XSIMath.CreateMatrix4()
 m4 = XSIMath.CreateMatrix4()
 im4 = XSIMath.CreateMatrix4()
 tm4 = XSIMath.CreateMatrix4()
 objectMatrix = obj.Kinematics.Global.Transform.GetMatrix4(m4)
 im4.Invert(m4)
 offsetCount = 0
 
 
 #Center
 if CUSTOM_CENTER == False:
  center = getCenter()
 dLog("Center : " + vLog(center))
 
 #Radius
 if CUSTOM_RAD == False:
  radius = getBBOXRadius()
  
 #Local to Global
 aPos = getWorldPos(pts,m4)
 
 #Normal)
 if CUSTOM_NORMAL == False:
  normal = getAveNormal(pts,m4)
 
 #CircleMatrix,offdetCount(IndexArray)
 circleMatrix,offsetCount = createCircleMatrix(aID,aPos,normal,center)
 dLog("offsetCount : " + str(offsetCount))
 
 #getNewWorldPos newPositionArray[[x,y,z],[x,y,z]///]
 newPosA = getWorldCirclePointsPositionArray(aID,aPos,center,radius,circleMatrix,offsetCount)
 
 #setNewPosition
 for i in range(pointNum):
  app.Translate(oSel.Name + ".pnt[" + str(aID[i]) + "]", newPosA[i][0], newPosA[i][1], newPosA[i][2], 0, "siView", "siObj", "siXYZ", "", "", "", "", "", "", "", "", "", 0, "")

  
 #dLog(str(aPos))
 #dLog("Normal : " + vLog(normal))

 
 return
main()

近況

仕事
・リダクション作業が半分終わり
・キャラクター遅延気味

スクリプト挫折中
・屋根の処理
・電線の処理(カテナリー曲線)

心うきうき成分が足りない :p

2015年3月5日木曜日

Memo : 背景 The Order 1886

https://www.artstation.com/artist/bobbyjrice
http://www.polycount.com/forum/showthread.php?t=149706

the order 1886の背景さんらしいです。
スバラシイ。ああ、スバラシイ


2015年2月26日木曜日

円上にあつめる


Houdiniのチュートリアルで、
ポイントを円状に整列する
VOPSOP(ICEみたいなもの)があったので、
SI(Python)で確認してみた
確認しただけでコードは屑ですのであしからず

SIにはプラグインがあるので、
それを利用すればいいんだけどね
mx_Roundish

手順

1.中心点の作成
今回はBBOXを作成した

2.平面化する
(平面化で無い場合は球になります)


3.同距離に収める

・中心から、選択ポイントのベクトルを作成
・ベクトルをノーマライズ
・半径を掛ける
・中心とベクトルを足す

の順、スクリプトは
いろいろ適当なことやってるけど、
こんな感じ。

Houdiniはすでに平面状のポイントをそろえる
サンプルだったけど、

平面じゃなければ、平面化すれば良いんじゃね?
ってことで確認してみた

最初に平面化するのが味噌だったのか。

実作業としては、等間隔に収めたいと思います
円周でのソートは今後の課題ですな


追記
ぐぐったらコードをはけん。
二つのベクトルがわかってればAtan2で角度がでるので、
それで、比較してるんですな。
座標を平面座標に変換する必要がありそうだけど。
すでに並んでいるから問題ないのかな?

3点の座標から簡単に角度と回転方向を求める. (2・3・N次元,外積を用いる方法)

この辺りも覚えておきたい所

近況

Houdiniの勉強をしてるんだけど、

・必要そうな機能を洗い出し>習得

と言うわけにはいかないっぽい。
前提条件がノードだし、
データの扱いは特殊だし
(普通のモデリングソフトとはいかない)

リアルタイムの扱いは少ないし

基本、チュートリアルをやってみて、
何が出来るか把握してからじゃないと
工程の途中で詰んでしまいます orz

かと言って
歴史は長いのでチュートリアルは多いし

今回みたいに応用の利く技術が多いので、
幅は広がりそうですね

プロシージャルモデリングのように
あとでジワジワ利くタイプです


■最近買った本
・Maya実戦 ハードサーフェースモデリング
・ウェザリングの教科書
・背景CG実戦テクニック

背景充

どの本もお値段以上の良本でした(吐血 orz

2015年2月11日水曜日

Softimage Script : VCTool(Softimage用、頂点カラー塗りツール)

背景用の頂点カラーツールです

開発途中で、SI終了の報がきたので、
投げちゃったのですが、
要望があったのでさらしてみます

グラデーションの塗りを緩和します

どうやら、複数のオブジェクトにはまだバギーな動きをしてますが、
リペイントで対応してください :p

自分が必要であれば対応しますw


使用の想定

・ハイトマップ、多メッシュでの一様なグラデーション
・手作業での頂点へのライティング
・選択したオブジェクトの明るさなどの調整(未完


つかいかたっぽいもの

選択した、オブジェクト、エッジ、頂点に対し
頂点カラーを設定、調整します
※頂点カラーはあらかじめ設定してやってください


コード

ScriptEditorにコピペして、
実行してください
・・・すごい適当ですみません

from win32com.client import constants as c
app = Application; log = app.LogMessage

BUTTONSIZE_LW = 50
BUTTONSIZE_LH = 48

def createLayout(cp,ColorList,FCurveColorList):
 log(cp)
 oly = cp.PPGLayout

 oly.AddTab( "Main" ) 
 oly.AddItem("ToPntSamples")
 
 oly.AddGroup("PerCent",False,10)
 oItem = oly.AddItem("Percent")
 #oItem.SetAttribute("cx",30)
 #oItem.SetAttribute("cy",30)
 oItem = oItem.SetAttribute("NoLabel",True)
 oly.EndGroup()
 
 #SetColor
 #--------------------------------------------
 oly.AddGroup("SetColor")
 oly.AddRow()
 oItem = oly.AddButton("Pick_SetColor","Pick")
 oItem.SetAttribute("cx",BUTTONSIZE_LW)
 oItem.SetAttribute("cy",BUTTONSIZE_LH)
 oItem = oly.AddColor( ColorList[0] + "_red", ColorList[0],True)
 oItem.SetAttribute("NoLabel",True)
 oItem = oly.AddButton("SetColor","Set")
 oItem.SetAttribute("cx",50)
 oItem.SetAttribute("cy",48)
 oly.EndRow()
 oly.AddRow()
 oly.EndRow()
 oly.EndGroup()
# 
# #UpperLayer 
# #--------------------------------------------
# oly.AddGroup("UpperLayer")
# oly.AddRow()
# oItem = oly.AddButton("Pick_UpperLayer","Pick")
# oItem.SetAttribute("cx",BUTTONSIZE_LW)
# oItem.SetAttribute("cy",BUTTONSIZE_LH)
# oItem = oly.AddColor( ColorList[1] + "_red", ColorList[1],False)
# oItem.SetAttribute("NoLabel",True)
# oly.EndRow()
# 
# oly.AddGroup("Darken")
# oly.AddRow()
# oly.AddButton("Multiple")
# oly.AddButton("HardLight") 
# oly.AddButton("Burn")
# oly.EndRow() 
# oly.EndGroup()
#
# oly.AddGroup("Lightn")
# oly.AddRow()
# oly.AddButton("Screen")
# oly.AddButton("ColorDodge") 
# oly.AddButton("LinerDodge")
# oly.EndRow() 
# oly.EndGroup()
#
# oly.AddGroup("Contrast")
# oly.AddRow()
# oly.AddButton("OverLay") 
# oly.AddButton("SoftLight")
# oly.EndRow()
# oly.EndGroup()
# 
# oly.EndGroup()

 #ColorMath
 #--------------------------------------------
 oly.AddGroup("ColorMath")
 oly.AddRow()
 oItem = oly.AddButton("Pick_ColorMath","Pick")
 oItem.SetAttribute("cx",BUTTONSIZE_LW)
 oItem.SetAttribute("cy",BUTTONSIZE_LH)
 oItem = oly.AddColor( ColorList[2] + "_red", ColorList[2],False)
 oItem.SetAttribute("NoLabel",True)
 oItem = oly.AddButton("ColorMath_Sub","Sub")
 oItem.SetAttribute("cx",30)
 oItem.SetAttribute("cy",48)
 oItem = oly.AddButton("ColorMath_Add","Add")
 oItem.SetAttribute("cx",30)
 oItem.SetAttribute("cy",48)
 oly.EndRow()
 
 oly.AddRow()
 oly.AddGroup("SetColor")
 oly.AddRow()
 oly.AddButton("ColorMath_00","|0|")
 oly.AddButton("ColorMath_x05","x0.5")
 oly.AddButton("ColorMath_x08","x0.8")
 oly.AddButton("ColorMath_05","|0.5|")
 oly.AddButton("ColorMath_x12","x1.2")
 oly.AddButton("ColorMath_x20","x2")
 oly.AddButton("ColorMath_10","|1.0|")
 oly.EndRow()
 oly.EndGroup()
 oly.EndRow()
 oly.EndGroup()


 #+ Gra ++++++++++++++++++++++++++++++++++++++++++
 oly.AddTab( "Grad" )
 
 oly.AddItem("ToPntSamples")

 #-Percent------------------- 
 oly.AddGroup("PerCent",False,10)
 oItem = oly.AddItem("Percent")
 oItem = oItem.SetAttribute("NoLabel",True)
 oly.EndGroup()
  
 oly.AddGroup("Gradation") 
 #oly.AddButton("test")
 oly.AddRow()
 oItem = oly.AddButton("Gradation_Exe","Paint")
 oItem.SetAttribute("cx",100)
 oItem.SetAttribute("cy",48)
 oItem = oly.AddButton("RePaint","Re Paint")
 oItem.SetAttribute("cx",100)
 oItem.SetAttribute("cy",48)
 oly.EndRow()

 
 #-Type
 oly.AddGroup("Composit")
 Array = ["Normal",0,"Multiple",1]
 oItem = oly.AddEnumControl("GraComposition",Array,"Comp",c.siControlCombo)
 oItem.SetAttribute("NoLabel", True)
 oly.EndGroup()
 
 oly.AddRow()
 oly.AddGroup("Color")
 Array = ["Color1 > Bace",0,"Color1 > Color2",1]
 oItem = oly.AddEnumControl("GraColorPattern",Array,"ColorPattern",c.siControlCombo)
 oItem.SetAttribute("NoLabel", True)
 oly.EndGroup()
 
 oly.AddGroup("Form")
 oItem = oly.AddEnumControl("GraForm",["Linear",0,"Radial",1],"Comp",c.siControlCombo)
 oItem.SetAttribute("NoLabel", True)
 oly.EndGroup()
 oly.EndRow()
 
 #- FCurve Color -------------------
 oly.AddGroup("Color1")
 oly.AddRow()
 oItem = oly.AddButton("Pick_FCurveColor1","Pick")
 oItem.SetAttribute("cx",BUTTONSIZE_LW)
 oItem.SetAttribute("cy",BUTTONSIZE_LH)
 oItem = oly.AddColor( FCurveColorList[0] + "_red", FCurveColorList[0],True)
 oItem.SetAttribute("NoLabel",True)
 oly.EndRow()
 oly.AddRow()
 oly.EndRow()
 oly.EndGroup()
 
 oly.AddGroup("Color2")
 oly.AddRow()
 oItem = oly.AddButton("Pick_FCurveColor2","Pick")
 oItem.SetAttribute("cx",BUTTONSIZE_LW)
 oItem.SetAttribute("cy",BUTTONSIZE_LH)
 oItem = oly.AddColor( FCurveColorList[1] + "_red", FCurveColorList[1],True)
 oItem.SetAttribute("NoLabel",True)
 oly.EndRow()
 oly.AddRow()
 oly.EndRow()
 oly.EndGroup()


 #-Position-------------------  
 oly.AddGroup("Start_Position")
 oly.AddRow()
 oItem = oly.AddButton("pick_aPosButton","Pick")
 oItem.SetAttribute("cx",BUTTONSIZE_LW) 
 oItem = oly.AddItem("aPosX","x")
 oItem.SetAttribute("cx",BUTTONSIZE_LW)
 oItem.SetAttribute("noslider",True)
 oItem.SetAttribute("NoLabel",True)
 oItem = oly.AddItem("aPosY","y")
 oItem.SetAttribute("cx",BUTTONSIZE_LW)
 oItem.SetAttribute("noslider",True)
 oItem.SetAttribute("NoLabel",True)
 oItem = oly.AddItem("aPosZ","z")
 oItem.SetAttribute("cx",BUTTONSIZE_LW)
 oItem.SetAttribute("noslider",True)
 oItem.SetAttribute("NoLabel",True) 
 oly.EndRow()
 oly.EndGroup() 
 oly.AddGroup("End_Position")
 oly.AddRow()
 oItem = oly.AddButton("pick_bPosButton","Pick")
 oItem.SetAttribute("cx",BUTTONSIZE_LW)
 oItem = oly.AddItem("bPosX","x")
 oItem.SetAttribute("cx",BUTTONSIZE_LW)
 oItem.SetAttribute("noslider",True)
 oItem.SetAttribute("NoLabel",True)
 oItem = oly.AddItem("bPosY","y")
 oItem.SetAttribute("cx",BUTTONSIZE_LW)
 oItem.SetAttribute("noslider",True)
 oItem.SetAttribute("NoLabel",True)
 oItem = oly.AddItem("bPosZ","z")
 oItem.SetAttribute("cx",BUTTONSIZE_LW)
 oItem.SetAttribute("noslider",True)
 oItem.SetAttribute("NoLabel",True)
 oly.EndRow()
 oly.EndGroup()

 #-FCurve-------------------
 oly.AddGroup("PaintGradation")
 oly.AddFCurve("FCurve",150)
 oly.EndGroup()
 
 oly.EndGroup()
 
 return oly
 

#---------------------------------------------------
# addColorParam3
#---------------------------------------------------
def addColorParam3(cp,inName):
 colorList = ["red","green","bule","alpha"]
 colorList = [inName + "_" + i for i in colorList]
 for i in colorList:
  cp.AddParameter3( i, c.siDouble,1,0,1 ,False)


#---------------------------------------------------
# addColorParam
#---------------------------------------------------
def addColorParam(cp,colorList):
 #SetColor
 for i in colorList:
  addColorParam3(cp,i)
  
#---------------------------------------------------
# addOtherParam
#--------------------------------------------------- 
def addOtherParam(cp):
  
 cp.AddParameter3("Percent",c.siDouble,100,0.01,100,False)
 cp.AddParameter3("ToPntSamples",c.siBool,False,"","",False)
 
 oFCParam = cp.AddFCurveParameter("FCurve")
 oFCurve = oFCParam.Value
 oFCurve.BeginEdit()
 oFCurve.RemoveKeys()

 oFCurve.AddKey( 100, 0)
 oFCurve.AddKey( 0, 1)
 
 oFCurve.Interpolation = 2
 
 oFCurve.EndEdit();


 #Gradation
 cp.AddParameter3("GraComposition", c.siInt4, 0,0,1,False)
 cp.AddParameter3("GraColorPattern", c.siInt4,0,0,1,False)
 cp.AddParameter3("GraForm", c.siInt4, 0,0,1,False)
 cp.AddParameter3("GraPercentage", c.siDouble,100,0.01,100,False)
 
 cp.AddParameter3("aPosX",c.siDouble,0,-10000,10000,False)
 cp.AddParameter3("aPosY",c.siDouble,0,-10000,10000,False)
 cp.AddParameter3("aPosZ",c.siDouble,0,-10000,10000,False)
 cp.AddParameter3("bPosX",c.siDouble,0,-10000,10000,False)
 cp.AddParameter3("bPosY",c.siDouble,10,-10000,10000,False)
 cp.AddParameter3("bPosZ",c.siDouble,0,-10000,10000,False)
 
 oFCurve.EndEdit()

def lyLogic(ly):
 ly.Language = "Python"
 ly.Logic = """
app = Application; log = app.LogMessage

def test_OnClicked():
 fc = PPG.FCurve.Value
 log("Test")
 log(fc.Eval(20))

def getMixPercentage(inA,inB,inPercentage):
 aValue = inA * inPercentage / 100
 bValue = inB * ( 100 - inPercentage) / 100
 return aValue + bValue


# pickVertexRGBA
#---------------------------------
def pickVertexRGBA():
 oSel = app.Selection
 currentFilter = oSel.Filter
 app.SetSelFilter("SampledPoint")
 oPick = app.PickElement()
 #log(oPick(2))
 
 if oPick(0) != 0:
  pickSample = oPick(2).SubComponent.ComponentCollection(0).Index
  
 else :
  log(Cancel)
  app.SetSelFilter(currentFilter)
  pickSample = -1
  return False
 app.SetSelFilter(currentFilter)
 getVArray = oPick(2).SubComponent.Parent3DObject.ActivePrimitive.Geometry.CurrentVertexColor
 
 if getVArray == None:
  return False
 aRGBAs = getVArray.Elements.Array
 return [ aRGBAs[0][pickSample], aRGBAs[1][pickSample], aRGBAs[2][pickSample], aRGBAs[3][pickSample] ]
 
 
def Up_OnClicked():
 Inspects = PPG.Inspected
 for Inspected in Inspects:
  log(Inspected.Parameters("base_red") )
  Inspected.Parameters("base_red").Value = .1
  for oPrames in Inspected.Parameters:
   log(oPrames)
   #oParams("base_red").Value = .1
 return

def SetColorMathParam(in_Vale):
 PPG.Math_red.Value = in_Vale
 PPG.Math_green.Value = in_Vale
 PPG.Math_bule.Value = in_Vale
 #PPG.Math_alpha.Value = in_Vale
 return

#------------------------------------------------------
def minmax(inValue):
 if inValue < 0:
  return 0.0
 elif inValue > 1:
  #log("a")
  return 1.0
 else :
  return inValue


def SetColorMulMathParam(in_Vale):
 PPG.Math_red.Value   = minmax( PPG.Math_red.Value * in_Vale )
 PPG.Math_green.Value = minmax( PPG.Math_green.Value * in_Vale )
 PPG.Math_bule.Value  = minmax( PPG.Math_bule.Value  * in_Vale )
 #PPG.Math_alpha.Value  = minmax( PPG.Math_alpha.Value  * in_Vale )
 return
 
#------------ScalerAlglithm--------------------------

def ScalerSub(inA,inB):
 return inA - inB
 
def ScalerAdd(inA,inB):
 return inA + inB

#
def scalerMultiple(bg,fg):
 return fg * bg
 
#スクリーン
def scalerScreen(bg,fg):
 return 1 - ( ( 1 - bg ) * ( 1 - fg ) )

#オーバーレイ
def scalerOverLay(bg,fg):
 if bg < 0.5:
  return 2.0 * bg * fg
 if bg >= 0.5:
  return 1 - 2 * ( ( 1- bg ) * ( 1- fg ) )

#ソフトライト
def scalerSoftLight(bg,fg):
 if fg < 0.5:
  return bg ** ( 2 * ( 1 - fg ) )
 if fg >= 0.5:
  return bg ** ( 1 / ( 2 * fg ) )
  
#ハードライト
def scalerHardLight( bg, fg ):
 if fg < 0.5:
  return bg * fg * 2
 if fg >= 0.5:
  return 1 - 2 * ( 1 - bg) * ( 1 - fg )
  
#焼き込み
def scalerBurn(bg,fg):
 if fg == 0:
  return 1
 return 1.0 - ( 1.0 + bg ) / fg
 
#覆いカラー
def scalerDodge(bg,fg):
 if bg + fg > 1.0:
  return 1.0
 elif bg > 0:
  return bg  /(1.0 - fg )
 else :
  return 0.0
  
#覆い焼きリニア   
def scalerLinearDodge(bg,fg):
 if bg + fg > 1.0:
  return 1
 else :
  return bg + fg
  
#------------------------------------------


def setRGB(aVC,sID,inPercent):
 #R
 aVC[0][sID] = getMixPercentage( PPG.Set_red.Value , aVC[0][sID],inPercent)
 #G
 aVC[1][sID] = getMixPercentage( PPG.Set_green.Value , aVC[1][sID],inPercent)
 #B
 aVC[2][sID] = getMixPercentage( PPG.Set_bule.Value , aVC[2][sID],inPercent)
 #A
 aVC[3][sID] = getMixPercentage( PPG.Set_alpha.Value , aVC[3][sID],inPercent)


def Set_ColorMath_Sub_RGB(aVC,sID,inPercent):
 #R
 aVC[0][sID] = minmax ( getMixPercentage( ScalerSub(aVC[0][sID],PPG.Math_red.Value) , aVC[0][sID],inPercent) )
 #G
 aVC[1][sID] = minmax (  getMixPercentage( ScalerSub(aVC[1][sID],PPG.Math_green.Value) , aVC[1][sID],inPercent) )
 #B
 aVC[2][sID] = minmax (  getMixPercentage( ScalerSub(aVC[2][sID],PPG.Math_bule.Value) , aVC[2][sID],inPercent) )
 #A
 #aVC[3][sID] = minmax (  getMixPercentage( ScalerSub(aVC[3][sID],PPG.Math_alpha.Value) , aVC[3][sID],inPercent) )


def Set_ColorMath_Add_RGB(aVC,sID,inPercent):
 #R
 aVC[0][sID] = minmax ( getMixPercentage( ScalerAdd(aVC[0][sID],PPG.Math_red.Value) , aVC[0][sID],inPercent) )
 #G
 aVC[1][sID] = minmax (  getMixPercentage( ScalerAdd(aVC[1][sID],PPG.Math_green.Value) , aVC[1][sID],inPercent) )
 #B
 aVC[2][sID] = minmax (  getMixPercentage( ScalerAdd(aVC[2][sID],PPG.Math_bule.Value) , aVC[2][sID],inPercent) )
 #A
 #aVC[3][sID] = minmax (  getMixPercentage( ScalerAdd(aVC[3][sID],PPG.Math_alpha.Value) , aVC[3][sID],inPercent) )


#Set
#----------------------------------------

#----------------------------------
# getSelectSampleIDs
#----------------------------------
def getSelectSampleIDs(oSel,gToPntSmps):
 #oGeo = oSel.ActivePrimitive.Geometry
 #VC = oGeo.CurrentVertexColor
 log(oSel.Type)

 oSmpIDs = []

 #Obj
 if oSel.Type == "polymsh":
  oGeo = oSel.ActivePrimitive.Geometry
  VC = oGeo.CurrentVertexColor
  if VC == None:
   return -1
  oSmpIDs = range(oGeo.Samples.Count)
 
 #poly
 elif oSel.Type == "polySubComponent":
  oSub = oSel.SubComponent
  oColl = oSel.SubComponent.ComponentCollection
  
  #PolygonPnt Poly > pnt > sample
  if gToPntSmps:
   for oPoly in oColl:
    oPnts = oPoly.Points    
    for oPnt in oPnts:
     oSamples = oPnt.Samples
     for oSmp in oSamples:
      oSmpIDs.append(oSmp.Index)
      
  #Poly > Sampe
  else :    
   for oPoly in oColl:
    oSamples = oPoly.Samples
    for oSmp in oSamples:
     oSmpIDs.append(oSmp.Index)
 
 #Edge
 elif oSel.Type == "edgeSubComponent":
  oSub = oSel.SubComponent
  oColl = oSel.SubComponent.ComponentCollection
  
  #PolygonPnt Edge > pnt > sample
  if gToPntSmps:
   for oEdge in oColl:
    oPnts = oEdge.Points    
    for oPnt in oPnts:
     oSamples = oPnt.Samples
     for oSmp in oSamples:
      oSmpIDs.append(oSmp.Index)
      
  #Poly > Sampe
  else :    
   for oEdge in oColl:
    oSamples = oEdge.Samples
    for oSmp in oSamples:
     oSmpIDs.append(oSmp.Index)
     
 #Point   
 elif oSel.Type == "sampleSubComponent":
  oColl = oSel.SubComponent.ComponentCollection
  for oSmp in oColl:
   oSmpIDs.append(oSmp.Index)
    
 #Sample   
 elif oSel.Type == "pntSubComponent":
  oColl = oSel.SubComponent.ComponentCollection
  for oPnt in oColl:
   oSamples = oPnt.Samples
   for oSmp in oSamples:
    oSmpIDs.append(oSmp.Index)
 
 else :
  log("Pls Select Poly or Pnt")
  return -1
 
 return oSmpIDs

# SetColor
#-------------------------------
def SetColor(DrawingMode):

 gToPntSmps = PPG.ToPntSamples.Value
 gPacentege = PPG.Percent.Value
 
 oSels = app.Selection
 
 for oSel in oSels:
  
  oSmpIDs = getSelectSampleIDs(oSel,gToPntSmps)
  
  if oSmpIDs == -1:
   continue
   
  if oSel.Type != "polymsh":
   oSub = oSel.SubComponent
   oObj = oSub.Parent3DObject
  else:
   oObj = oSel
   
  oGeo = oObj.ActivePrimitive.Geometry
  Clusters = oGeo.Clusters.Filter("sample")
  for Cls in Clusters:
   for oProp in Cls.Properties:
    if(oProp.Name == "Vertex_Color"):

     aVC = oProp.Elements.Array
     aVC = [list(aVC[0]),list(aVC[1]),list(aVC[2]),list(aVC[3])]
     
     #SetColor
     if DrawingMode == "Set": 
      for i in oSmpIDs:
       setRGB(aVC,i,gPacentege)
       
     #ColorMath_Sub
     if DrawingMode == "ColorMath_Sub": 
      for i in oSmpIDs:
       Set_ColorMath_Sub_RGB(aVC,i,gPacentege)
       
     #ColorMath_Add
     if DrawingMode == "ColorMath_Add": 
      for i in oSmpIDs:
       Set_ColorMath_Add_RGB(aVC,i,gPacentege)
     
     #Burn
     if DrawingMode == "Burn":
      for i in oSmpIDs:
       rgbBurn(aVC,i)
       
     #Dodge
     if DrawingMode == "Dodge":
      for i in oSmpIDs:
       rgbDodge(aVC,i)
       
     #Multiple
     if DrawingMode == "Multiple":
      for i in oSmpIDs:
       rgbMultiple(aVC,i)
          
     oProp.Elements.Array = aVC

def SetColor_OnClicked():
 SetColor("Set")
 return
 
def ColorMath_Sub_OnClicked():
 log("Sub")
 SetColor("ColorMath_Sub")
 return 
 
def ColorMath_Add_OnClicked():
 log("Add")
 SetColor("ColorMath_Add")
 return
 

def ColorMath_00_OnClicked():
 SetColorMathParam(0.0)
 return 
def ColorMath_x05_OnClicked():
 SetColorMulMathParam(0.5)
 return 
def ColorMath_x08_OnClicked():
 SetColorMulMathParam(0.8)
 return
def ColorMath_05_OnClicked():
 SetColorMathParam(0.5)
 return 
def ColorMath_x12_OnClicked():
 SetColorMulMathParam(1.2)
 return 
def ColorMath_x20_OnClicked():
 SetColorMulMathParam(2.0)
 return
def ColorMath_10_OnClicked():
 SetColorMathParam(1.0)
 return


#----------------------------------------
#Pick VertexColor
#----------------------------------------
def Pick_FCurveColor1_OnClicked():
 rgba = pickVertexRGBA()
 if rgba == False:
  return
 PPG.FCurve1_red.Value = rgba[0]
 PPG.FCurve1_green.Value = rgba[1]
 PPG.FCurve1_bule.Value = rgba[2]
 PPG.FCurve1_alpha.Value = rgba[3]
 return

def Pick_FCurveColor2_OnClicked():
 rgba = pickVertexRGBA()
 if rgba == False:
  return
 PPG.FCurve2_red.Value = rgba[0]
 PPG.FCurve2_green.Value = rgba[1]
 PPG.FCurve2_bule.Value = rgba[2]
 PPG.FCurve2_alpha.Value = rgba[3]
 return

def Pick_SetColor_OnClicked():
 rgba = pickVertexRGBA()
 if rgba == False:
  return
 PPG.Set_red.Value = rgba[0]
 PPG.Set_green.Value = rgba[1]
 PPG.Set_bule.Value = rgba[2]
 PPG.Set_alpha.Value = rgba[3]
 return
 
def Pick_UpperLayer_OnClicked():
 rgba = pickVertexRGBA()
 if rgba == False:
  return
 PPG.UpperLayer_red.Value = rgba[0]
 PPG.UpperLayer_green.Value = rgba[1]
 PPG.UpperLayer_bule.Value = rgba[2]
 PPG.UpperLayer_alpha.Value = rgba[3]
 return
 
def Pick_ColorMath_OnClicked():
 rgba = pickVertexRGBA()
 if rgba == False:
  return
 PPG.Math_red.Value = rgba[0]
 PPG.Math_green.Value = rgba[1]
 PPG.Math_bule.Value = rgba[2]
 PPG.Math_alpha.Value = rgba[3]
 return
 
#-Gra--------------------------------------

def pickPosition():
 oPos = XSIMath.CreateVector3()
 oPick = app.PickPosition()
 if oPick(0) == 0:
  log("Pick Cancel")
  return -1
 oPos.X = oPick(1)
 oPos.Y = oPick(2)
 oPos.Z = oPick(3)
 return oPos


def setAPosition():
 oPos = pickPosition()
 if oPos == -1:
  return 
 PPG.aPosX.Value = oPos.X
 PPG.aPosY.Value = oPos.Y
 PPG.aPosZ.Value = oPos.Z
 return

def setBPosition():
 oPos = pickPosition()
 if oPos == -1:
  return 
 PPG.bPosX.Value = oPos.X
 PPG.bPosY.Value = oPos.Y
 PPG.bPosZ.Value = oPos.Z
 return
 
def pick_aPosButton_OnClicked():
 log("pick_aPos")
 setAPosition()
 return
 
def pick_bPosButton_OnClicked():
 log("pick_bPos")
 setBPosition()
 return

#----------------------------------
# pickPosition
#----------------------------------
def pickPosition():
 oPos = XSIMath.CreateVector3()
 oPick = app.PickPosition()
 if oPick(0) == 0:
  log("Pick Cancel")
  return -1
 oPos.X = oPick(1)
 oPos.Y = oPick(2)
 oPos.Z = oPick(3)
 return oPos
 
 
#------------------------------
# getGlobalPntsPositions
#------------------------------
def getGlobalPntsPositions(oObj,activePoints):
 oGeo = oObj.ActivePrimitive.Geometry
 oPnts = oGeo.Points
 aPos = oPnts.PositionArray
 aPos = [list(aPos[0]),list(aPos[1]),list(aPos[2])]
 v = XSIMath.CreateVector3()
 m = XSIMath.CreateMatrix4()
 oTrans = oObj.Kinematics.Global.Transform
 oTrans.GetMatrix4(m)
 
 for i in range(oPnts.Count):
  if activePoints[i]:
   v.Set(aPos[0][i],aPos[1][i],aPos[2][i])
   v.MulByMatrix4InPlace(m)
   aPos[0][i] = v.X
   aPos[1][i] = v.Y
   aPos[2][i] = v.Z
  
 return aPos

 
#------------------------------
# getSmp2Pnt
#------------------------------
def getSmp2Pnt(oGeo):
 smp2pnt = []
 
 oSmps = oGeo.Samples
 oPnts = oGeo.Points
 
 for i in oSmps:
  smp2pnt.append(-1)
  
 for oPnt in oPnts:
  for smp in oPnt.Samples:
   smp2pnt[smp.Index] = oPnt.Index
   
 return smp2pnt


#------------------------------
# getActivePoints
#------------------------------
def getActivePoints(nbPnts,smp2pnt,oSmpIDs):
 activePnts = []
 
 for i in range(nbPnts):
  activePnts.append(False)  
 for i in oSmpIDs:
  activePnts[ smp2pnt [ i ] ] = True
 
 return activePnts

#------------------------------
# getDistanceArray
#------------------------------
def getDistanceArray(gradientType,nbPnts,p1,p2,aPos,activePoints):
 distanceArray = []
 for i in range(nbPnts):
  distanceArray.append( -1.0 )

 v = XSIMath.CreateVector3()
 
 if gradientType == 0: #Linear Plane to Point
  n = XSIMath.CreateVector3()
  n.Sub(p2,p1)
  n.NormalizeInPlace()
  for i in range(nbPnts):
   if activePoints[i]:
    v.Set(aPos[0][i],aPos[1][i],aPos[2][i])
    v.SubInPlace(p1)
    len = v.Dot( n )
    #log(len)
    distanceArray[i] =  abs( len )  
 
 if gradientType == 1: # Distance
  for i in range(nbPnts):
   if activePoints[i]:
    v.Set(aPos[0][i],aPos[1][i],aPos[2][i])
    v.SubInPlace(p1)
    #log(v.Length())
    distanceArray[i] =  v.Length()
 return distanceArray
 

#------------------------------
# getDistanceArray
#------------------------------
def  getPercentage(nbPnts,p1,p2,distanceArray,activePoints):
 percentageArray =[]
 for i in range(nbPnts):
  percentageArray.append(100)
 p1.SubInPlace(p2)
 length = p1.Length()
 if length == 0:
  log("Plz Select2Pnt")
  return
 
 for i in range(nbPnts):
  if activePoints[i]:
   per = abs( distanceArray[i]/ length * 100 )
   if per > 100:
    per = 100
   per = 100 - per
   #log(per)
   percentageArray[i] =  per
 return percentageArray


#------------------------------
# perArrayToFCurvePerArray
#------------------------------
def perArrayToFCurvePerArray(percentageArray):

 fc = PPG.FCurve.Value
 for i,per in enumerate( percentageArray ):
  percentageArray[i] = 100 - ( minmax( fc.Eval( per ) ) * 100 )
 return  percentageArray


#------------------------------
# gradationExe
#------------------------------
def gradationExe(rePaint):
 gradientType = PPG.GraForm.Value
 gradientColorType = PPG.GraColorPattern.Value
 gToPntSmps = PPG.ToPntSamples.Value

 #Color
 c1 = [PPG.FCurve1_red.Value,
    PPG.FCurve1_green.Value,
    PPG.FCurve1_bule.Value,
    PPG.FCurve1_alpha.Value]
  
 c2 = [PPG.FCurve2_red.Value,
    PPG.FCurve2_green.Value,
    PPG.FCurve2_bule.Value,
    PPG.FCurve2_alpha.Value]
    
 #Position
 if rePaint:
  p1 = XSIMath.CreateVector3()
  p1.Set(
  PPG.aPosX.Value,
  PPG.aPosY.Value,
  PPG.aPosZ.Value )
  
  p2 = XSIMath.CreateVector3()
  p2.Set(
  PPG.bPosX.Value,
  PPG.bPosY.Value,
  PPG.bPosZ.Value )  
 
 else:
  p1 = pickPosition()
  if p1 == -1:
   return

  PPG.aPosX.Value = p1.X
  PPG.aPosY.Value = p1.Y
  PPG.aPosZ.Value = p1.Z
   
  p2 = pickPosition()
  if p2 == -1:
   return
  
  PPG.bPosX.Value = p2.X
  PPG.bPosY.Value = p2.Y
  PPG.bPosZ.Value = p2.Z

 oSels = app.Selection
  
 for oSel in oSels:
 
  oSmpIDs = getSelectSampleIDs(oSel,gToPntSmps)
  if oSmpIDs == -1:
   continue
   
  if oSel.Type != "polymsh":
   oSub = oSel.SubComponent
   oObj = oSub.Parent3DObject
  else:
   oObj = oSel
   
  oGeo = oObj.ActivePrimitive.Geometry
  oPnts = oGeo.Points
  nbPnts = oPnts.Count
  
  smp2pnt = getSmp2Pnt(oGeo)
  activePoints = getActivePoints(nbPnts,smp2pnt,oSmpIDs)
  aPos = getGlobalPntsPositions(oObj,activePoints)
  distanceArray = getDistanceArray(gradientType,nbPnts,p1,p2,aPos,activePoints)
  percentageArray = getPercentage(nbPnts,p1,p2,distanceArray,activePoints)
  percentageArray = perArrayToFCurvePerArray(percentageArray)
  
  Clusters = oGeo.Clusters.Filter("sample")
  for Cls in Clusters:
   for oProp in Cls.Properties:
    if(oProp.Name == "Vertex_Color"):

     aVC = oProp.Elements.Array
     aVC = [list(aVC[0]),list(aVC[1]),list(aVC[2]),list(aVC[3])]
     
     #Normal
     if PPG.GraComposition.Value == 0:
     
      #Color1 > Bace
      if gradientColorType == 0:
       for i in oSmpIDs:
        r = getMixPercentage( c1[0],aVC[0][i],percentageArray[smp2pnt[i]])
        g = getMixPercentage( c1[1],aVC[1][i],percentageArray[smp2pnt[i]])
        b = getMixPercentage( c1[2],aVC[2][i],percentageArray[smp2pnt[i]])
        a = getMixPercentage( c1[3],aVC[3][i],percentageArray[smp2pnt[i]])
        aVC[0][i] = getMixPercentage( r, aVC[0][i], PPG.Percent.Value )
        aVC[1][i] = getMixPercentage( g, aVC[1][i], PPG.Percent.Value )
        aVC[2][i] = getMixPercentage( b, aVC[2][i], PPG.Percent.Value )
        aVC[3][i] = getMixPercentage( a, aVC[3][i], PPG.Percent.Value )
        
      #Color1 > Color2
      if gradientColorType == 1:
       for i in oSmpIDs:
        r = getMixPercentage( c1[0], c2[0], percentageArray[smp2pnt[i]])
        g = getMixPercentage( c1[1], c2[1], percentageArray[smp2pnt[i]])
        b = getMixPercentage( c1[2], c2[2], percentageArray[smp2pnt[i]])
        a = getMixPercentage( c1[3], c2[3], percentageArray[smp2pnt[i]])
        aVC[0][i] = getMixPercentage( r, aVC[0][i], PPG.Percent.Value )
        aVC[1][i] = getMixPercentage( g, aVC[1][i], PPG.Percent.Value )
        aVC[2][i] = getMixPercentage( b, aVC[2][i], PPG.Percent.Value )
        aVC[3][i] = getMixPercentage( a, aVC[3][i], PPG.Percent.Value )
        
     #Multiple
     if PPG.GraComposition.Value == 1:
     
      #Color1 > Bace
      if gradientColorType == 0:
       for i in oSmpIDs:
        #r = getMixPercentage( c1[0],aVC[0][i],percentageArray[smp2pnt[i]])
        #g = getMixPercentage( c1[1],aVC[1][i],percentageArray[smp2pnt[i]])
        #b = getMixPercentage( c1[2],aVC[2][i],percentageArray[smp2pnt[i]])
        #a = getMixPercentage( c1[3],aVC[3][i],percentageArray[smp2pnt[i]])
        r = getMixPercentage( c1[0],1,percentageArray[smp2pnt[i]])
        g = getMixPercentage( c1[1],1,percentageArray[smp2pnt[i]])
        b = getMixPercentage( c1[2],1,percentageArray[smp2pnt[i]])
        a = getMixPercentage( c1[3],1,percentageArray[smp2pnt[i]])
        r = scalerMultiple(r,aVC[0][i])
        g = scalerMultiple(g,aVC[1][i])
        b = scalerMultiple(b,aVC[2][i])
        a = scalerMultiple(a,aVC[3][i])
        aVC[0][i] = getMixPercentage( r, aVC[0][i], PPG.Percent.Value )
        aVC[1][i] = getMixPercentage( g, aVC[1][i], PPG.Percent.Value )
        aVC[2][i] = getMixPercentage( b, aVC[2][i], PPG.Percent.Value )
        aVC[3][i] = getMixPercentage( a, aVC[3][i], PPG.Percent.Value )
        
      #Color1 > Color2
      if gradientColorType == 1:
       for i in oSmpIDs:
        r = getMixPercentage( c1[0], c2[0], percentageArray[smp2pnt[i]])
        g = getMixPercentage( c1[1], c2[1], percentageArray[smp2pnt[i]])
        b = getMixPercentage( c1[2], c2[2], percentageArray[smp2pnt[i]])
        a = getMixPercentage( c1[3], c2[3], percentageArray[smp2pnt[i]])
        r = minmax( scalerMultiple(r,aVC[0][i]) )
        g = minmax( scalerMultiple(g,aVC[1][i]) )
        b = minmax( scalerMultiple(b,aVC[2][i]) )
        a = minmax( scalerMultiple(a,aVC[3][i]) )
        aVC[0][i] = getMixPercentage( r, aVC[0][i], PPG.Percent.Value )
        aVC[1][i] = getMixPercentage( g, aVC[1][i], PPG.Percent.Value )
        aVC[2][i] = getMixPercentage( b, aVC[2][i], PPG.Percent.Value )
        aVC[3][i] = getMixPercentage( a, aVC[3][i], PPG.Percent.Value )


     oProp.Elements.Array = aVC
     

#------------------------------
def Gradation_Exe_OnClicked():
 gradationExe(False)

#------------------------------
def RePaint_OnClicked():
 log("RePaint")
 gradationExe(True)

"""

def main():

 cp = XSIFactory.CreateObject("CustomProperty")
 cp.Name = "VertexColorTools"
 
 colorList = ["Set","UpperLayer","Math"]
 addColorParam(cp,colorList)
 addOtherParam(cp)
 FCurveColorList = ["FCurve1","FCurve2"]
 addColorParam(cp,FCurveColorList)
 
 oly = createLayout(cp,colorList,FCurveColorList)
 lyLogic(oly)
 
 app.InspectObj(cp,"","",3)

main()

2015年2月9日月曜日

MAYA Plugin : AlignPlaneManip

指定のベクトルで平面に揃えたいじゃないですかーーー

SIのスクリプトは作ったのですが。

MoriさんがMAYA + C++ で作っておられ、
さらにGitでの公開での太っ腹っぷり。

それは参考にしますよ :p
こちら


いま、ちょっと時間が足りないけど

Memo : エフェクトとか、スライドとか

絶賛背景修羅場中

メインはSIだけど、
SpeedTree使ったり、
SubstanceDesignerつかったり。

ソフトになれて来て時間の短縮が可能になった分
クオリティが上がってると信じたい。

※だけど手書きの質感が一番好きです


エフェクトについてのスライド

関西CEDECのせい?
有用な情報がたくさん


以前から気になってたハイエンドゲームへのテクニック。

あるある
エフェクトは半透明をどうするかの問題において、
イロイロ制約がおおいんだよね orz


UE4本を買ってみたのでUnityと比較してみます。
はっきり言ってUnityでのエフェクト制作は制限があってきついです。
まあ、勉強になります。
シェーダーとかのな!!!


おおお、これ自分がHoudini Indieを買った理由、
コレがしたいんですよ・・・。
エフェクトについてはSIからHoudiniに移行したい所


できれば〜
やっぱお金があると、新しいマシンが買えて余裕も出るよね・・・的な。

2015年2月4日水曜日

Photoshop CC 2014のカスタムパネルの制作 1

Photoshop cc2014 ExtentionBuilder3.md—/Users/kawabata_imac/Dropbox/Blog/Photoshop

Photoshop CC 2014 から
Flashを利用したカスタムパレットの
サポートが無くなりました

パレットを簡単に作れていたツール
Adobe Configurator 4
利用出来なくなりましたが

CC 2014 でもボタンスクリプトまで出来ましたのでメモ

Adobe Extension Builder 3

Adobe Configurator and deprecated Flash-based panel support in Adobe CC products

Adobe Extantion Builder 3
を使えば開発が出来るようです

Extention Builder 3を
導入してみる事にします

OS環境

  • Microsoft® Windows® 7 (32-bit and 64-bit)
  • Microsoft Windows 8 (32-bit and 64-bit)
  • Mac OS® X v10.7 or higher

が、サポートされてるようです

開発環境

  • Eclipse 3.6 or higher

Eclipsという統合開発環境が必用なようです

実行環境

  • MACOSX 10.8
  • MACOSX 10.8 Windows8.1 64bit Parallels Ecripse 3.6
  • Windows7 Pro 64bit

三つの環境で試してみました

ここでは、Windowsの導入をしてみます

Adobe Extension Builder 3

Adobe Lab
上記のサイトに接続します。
下部の方に導入方法があります

導入方法

  1. Eclipse
    DOWNLOADS > Eclipse IDE for Java Developers
    を選択してDL、インストール

  2. Download Adobe Extension Builder 3
    Download Extension Builder 3をDLします
    展開しなくてOK

  3. eclipseのインストールと環境の整備
    eclipseはDLし、解凍すれば起動出来るのですが、
    いくつかの環境設定が必用です

立ち上がらない場合は以下の二つを確認してください

JAVAのSDK

MACの場合は要求されなかったですが、
Windowsの場合は
JAVAのSDK環境が必用です。
JDKのVerは1.6を要求してるのでこちらより
jdk-6u45-windows-x64.exe をDLインストールします

Pathを通す

フォルダ内の eclipse.ini
ファイルをテキストエディタ等でひらき
-vmargs の前に
-vm "JDKのPath" を追加すればOKです


-vm
C:\Program Files\Java\jdk1.6.0_45\bin\javaw.exe

これで起動するか確認してください

-参考-
Eclipse 起動時に使用する Java VM を指定する

4.ecripseを立ち上げ、 Help > Install New Software. > Add
ボタンを押し、DL済みの
"extensionbuilder_p3_080113.zip"
を選択します

5.Adobe Extension Builder 3をチェック

6.Next > を押しつつ進める(途中でライセンス規約あり)

7.eclipseの再起動を促されるので再起動します

ここまでで、インストールの作業は終了です

-参考-
extensionbuilder3 のリリースノート PDF

環境を Adobe Extantion Builderに

eclipseは統合開発環境ですので、
Extantion Builder に開発環境を設定します

  1. 立ち上げると Welcom メニューがあるので、それを"X"で閉じる

  2. Window > Open Perspective > Other より
    Adobe Extantion Builder 3を選択

環境を cc から cc 2014に

2015 2月現在の環境は CC が前提です。
これを現在の最新Verの CC 2014 に適用させます

  1. ターゲットアプリの変更

window > preferences より
Adobe Extenstion Builder 3 > CC Launching Paths > Target Application
これをPhotoshop CC 2014 に変更しました

2. 出力先のフォルダの変更

window > preferences より
Adobe Extenstion Builder 3 > CC Launching Paths > Sevice Maneger

Photoshop CC
C:\Program Files (x86)\Common Files\Adobe\CEPServiceManager4
C:\Users\Username\AppData\Roaming\Adobe\CEPServiceManager4

Photoshop CC 2014
C:\Program Files (x86)\Common Files\Adobe\CEP
C:\Users\Username\AppData\Roaming\Adobe\CEP

CC2014に変更してください

CEPフォルダが無い場合は 上記の2カ所に "CEP" フォルダを制作してください

  1. プロジェクトを作成します 適当にプロジェクトを作成します

  2. プロジェクトのVerを指定する
    書き出すXMLのVerが CC のままになっております。
    これを CC 2014 に変更します

プロジェクトを右クリック > Adobe Extention Builder 3 >
Bundle Manifest Editor >
Manifest.xml タブを選択 >
コード内で右クリック > Open Withでテキストエディターで開いて編集します

こちらを

Photoshop cc
            <Host Name="PHXS" Version="[14.0,14.9]" />
            <Host Name="PHSP" Version="[14.0,14.9]" />

            <RequiredRuntime Name="CSXS" Version="4.0" />

これに変更します

Photoshop cc 2014
            <Host Name="PHXS" Version="[15.0,15.9]" />
            <Host Name="PHSP" Version="[15.0,15.9]" />

            <RequiredRuntime Name="CSXS" Version="5.0" />

レジストリの変更

セキュリティの関係か、Adobeが許可したものでないと
Extantionは読み込まれません

これはDebugモードにすることで変更できます、
レジストリを変更します
Win: regedit > HKEY_CURRENT_USER/Software/Adobe/CSXS.5 右クリックから 新規 > 文字列値
で名前を変更し、値を設定します

文字列 : PlayerDebugMode
 : 1

環境設定
Adobe Extension Builder and Creative Cloud 2014

制作してみる

Ranしてみます
問題が無ければ PhotoshopCC 2014 が立ち上がります
Extentionから、Demoを選択

ボタンを押してみると
Hellow Photoshop
ダイアログが表示されます。

これで開発環境は構築出来ました

ここからの制作が大変そうですが、
とりあえず、今回はココまでにしとうございます orz

最後にフォーラムを見てねって感じ Forum

感想

espliseをインストールしないと行けないので難易度が上がった印象。
レジストリの変更とか難易度高すぎ

espliseをインストールしなくても
作成は出来るみたい(さらに高難易度?

HTML5になったことで、
Flash依存しないというのは良いかもしれないけど。

まあ、どのみち勉強はしないとダメね

メモ

  • Eclipse : オープンソースの、IBMの開発統合環境ツール

  • Runで出力される位置
    これが CC 2014 では
    C:\Users\Username\AppData\Roaming\Adobe\CEPServiceManager4\extensions\ C:\Users\Username\AppData\Roaming\Adobe\CEP\extensions\ となるみたい。ハマった

参考サイト

CEPガイド7:エクステンションのパッケージと配布
CCツールEXTENSIONをHTML5で作る Extension Builder 3のインストール
Adobe Extension Builder 3でCC 2014用の拡張開発環境を構築